How to Install Image Magick and Setup Paperclip
Handle file uploads and server-side image processing in your Rails 4 app with Paperclip and Image Magick
After I've got my basic app setup on my production server the next major component I usually find myself installing is the ability to handle file uploads and doing some server-side processing on any upload images. This comes in handy for a variety of applications from file attachments to user avatars. Every app likely needs a way for its users to get stuff from their computer to the cloud.
In this article, I'll be assuming you've already setup your app along the lines of my previous two posts and now want to include the ability for your users to include avatar images along with their profiles. I'll show you have to install Image Magick from source, setup the Paperclip gem, and include some basic image functionality into your Rails app.
There are certainly plenty of other libraries you could opt for, and you might need to handle different file types (not just images). I find Image Magick to have great support on multiple platforms with a plethora of options to cover nearly all of your image manipulation needs. On the application side of things, I like using the Paperclip gem for its simplicity and focused utility (it doesn't try to tell you how to do things, but gives you flexible options to adapt to different environments). I'm not trying to say these are your only options, just that these work well and are a good place to start as far as "getting stuff into the cloud" is concerned.
Back when I first started using Rails I used Attachment Fu. But this has long since stopped receiving updates. An alternative file upload gem that I recommend is Carrier Wave. And on the front-end of things, there are some nice JS libraries out there for making a more pleasant user experience (e.g., progress bars, previews, cropping adjustments) like jquery.fileupload and dropzone.js. Feel free to explore these options because I know they can add a great deal of value to your app.
Install Image Magick
Assuming you've got a Debian-based production environment like Ubuntu, you'll
first need to install some dependencies using apt-get
for the various image formats you'd like to support. Image Magick
supports GIF out of the box, but you'll need to make sure the other
formats you want to support are ready to go with the following CLI
command (this adds support for JPEG, PNG, TIFF, and compression using
BZip). Other dependencies can be referenced from the
Image Magick delegates page.
sudo apt-get install libpng12-dev libglib2.0-dev zlib1g-dev libbz2-dev libtiff4-dev libjpeg8-devNext, you'll need to grab the source code and pull it over to your production
server. I like to put all my source code stuff in ~/src, but feel free to put
it wherever you like. Image Magick maintains its
latest release here.
cd ~/src
wget http://www.imagemagick.org/download/ImageMagick.tar.gz
tar -xzvf ImageMagick.tar.gz
cd ImageMagick
You should now be inside the newly uncompressed ImageMagick directory. Next,
we'll run the configure
script and compile all the source code, finally installing it in the
system. If you need to run any custom config options, a huge list of
options can be referenced from the Image Magic
advanced unix installation page.
./configure
make
sudo make install
Finally, you'll need to configure the dynamic linker run-time
bindings to create the necessary links and cache to the most recent
shared libraries using the
ldconfig command.
sudo ldconfig /usr/local/libSetup Paperclip

Once you've got Image Magic setup on your server, you'll want to include file attachment support inside your app. To do this, I like using Thoughtbot's Paperclip gem. How you do this specifically will depend on your app's needs. Here, I'm assuming you simply want to add avatar images to an existing User model in your app. You can reference how this works with this example app I put together.
Include the paperclip gem in your Gemfile.
gem 'paperclip', '~> 3.0'Update your app and install the gem using bundle install.
Generate a new migration to add avatar columns to the users table. The Paperclip gem includes a handy migration helper to do just this, but you can do it manually if you want (refer to https://github.com/thoughtbot/paperclip for documentation).
rails g paperclip user avatarThis will add 4 columns to your model table for each attachment named in the
following way (where attachment is the name of your attachment, in this case
"avatar"). If you want to do the migration manually, these are the new columns
you need to add.
avatar_file_name(string)avatar_file_size(int)avatar_content_type(string)avatar_updated_at(datetime)
Once your migration is all setup, migrate the database.
rake db:migrateModel Attachment Settings
Now that the database is all setup, we can move to the application
code. You'll need to let Rails know that your model has a Paperclip
attachment by using Paperclip's built-in has_attached_file
method. This allows you to specify a number of things including a custom
path where the files should be saved, and in the case of images any
alternate versions you want to generate (like thumbnails), as well as
other command line options you want to pass. In the example app I use
the following settings.
has_attached_file :avatar,
  :path => ":rails_root/public/system/:attachment/:id/:basename_:style.:extension",
  :url => "/system/:attachment/:id/:basename_:style.:extension",
  :styles => {
    :thumb   => ['100x100#',  :jpg, :quality => 70],
    :preview => ['480x480#',  :jpg, :quality => 70],
    :large   => ['600>',   :jpg, :quality => 70],
    :retina  => ['1200>',  :jpg, :quality => 30]
  },
  :convert_options => {
    :thumb   => '-set colorspace sRGB -strip',
    :preview => '-set colorspace sRGB -strip',
    :large   => '-set colorspace sRGB -strip',
    :retina  => '-set colorspace sRGB -strip -sharpen 0x0.5'
  }
What this is doing is storing all avatar image file attachments in:
:rails_root/public/system/:class/:attachment/:id/:basename_:style.:extension`
For example, this might look like this when all the interpolation is filled in:
/www/myapp/releases/20081229172410/public/system/users/avatar/013/my_pic_thumb.png`
The reason I'm using this structure is because I'm using Capistrano for
deployment, which creates a public/system symlink to shared/system where all
uploaded attachments can be stored outside of the releases
directory thus persisting from deployment to deployment. You can choose
to customize this path as you see fit (the above example is slightly
different than the default).
In the "styles" option, you can specify as many named styles as you like. This will cause paperclip to generate additional versions of the uploaded image file (NOTE: this only works for images) using the named style (e.g., "imagename_stylename.extension"). For each style you can further define a size, filetype, and quality setting (in the case of JPEG). The size is defined according to the command line "geometry" option that you want to pass to Image Magick.
For example, if you want your thumbnails to be exactly 100x100 pixels, but you don't want the image to be distorted (e.g., squished) and instead crop off any part of the image that doesn't fit proportionally, you would add the "#" symbol to the end of your size definition. In my example for "large" I'm only defining the first dimension (width) and using the ">" symbol after it. This means that the image will be reduced in size such that the width is made to be 600 pixels wide, and the height is simply adjusted proportionally. There are a lot of different options that can be used.
Finally, I've added some custom "convert_options". This isn't absolutely necessary, but I'm including them here for your reference should you ever need to add more options (I had a hard time tracking down how to do this myself). Basically, you can add extra custom command line options here for each style (anything that Image Magick's convert command takes).
Here I'm setting a consistent colorspace of sRGB and stripping all the metadata to make the file as small as I can. Then, for the "retina" style, I'm saving it at twice the size of the "large" style, but then compressing it down to 30% quality, and further sharpening it by 0.5. This is simply a subjective setting that is based on my experimentation with different compression settings for double pixel density images (I found a little extra sharpening helped).
Use One Image To Rule Them All
You can save a single thumbnail size, at double the pixel density,
but drastically compressed, and it will retain an acceptable level of
quality to the human eye (e.g., a 600 pixel wide image shown in a 300
pixel wide space). The filesize is about the same as a higher quality
1:1 ratio image (e.g., a 600px image compressed to 20-30% quality using
JPEG would be approximately the same 40-50 KB as a 300px wide image
compressed to 80-90% quality using JPEG), but it looks better on retina
displays. I've just found that using a single, double density, highly
compressed thumbnail file served to all devices/screens is a
lot simpler to maintain compared to all the other crazy methods people
are supporting like user-agent sniffing, the <picture> tag, or complicated
SVG implementations. Make your life easier and balance compression with quality
using a single file.
See for yourself:
 |
 |
| Double Density (630x740px), 24% JPEG compression, 54 KB | Normal Density (315x370px), 85% JPEG compression, 54 KB |
An example Image Magick CLI command would be something like this:
convert -strip -quality 30% -resize 600x -sharpen 0x0.5 source.jpg output.jpgHere's more on the subject of double density, low quality images:
- http://gored.hu/optmising_jpg_for_retina_display/
- http://www.netvlies.nl/blog/design-interactie/retina-revolution
- http://alidark.com/responsive-retina-image-mobile/
Validations
Paperclip also includes some handy validation methods that you can take advantage of for handling these file attachments in your model. There are individual methods for each of 'presence', 'filesize', and 'content type' as well as an all-in-one option (which I prefer). This is how you might write a validation for your attachment that requires it be present, between 0-10 megabytes in size, and is an image (e.g., jpeg, gif, png, or tiff).
validates_attachment :avatar,
  :presence => true,
  :size => { :in => 0..10.megabytes },
  :content_type => { :content_type => /^image\/(jpeg|png|gif|tiff)$/ }
Note that the content_type expects a mime-type like "image/jpeg". In my example here I'm simply using a regular expression to match "image/whatever" for the different image mime-types.
Update Your Views (and Controllers)
Now you just need to tell your Rails app to allow the new "avatar"
parameter when you create/update the User model by adding it to the
params.require line in the controller (this is the new way of doing
attr_accessible in Rails 4) like this:
def user_params
  params.require(:user).permit(:name, :description, :avatar)
end
Then, you'll want to add the actual form field for attaching the avatar file to
the model in the _form.html.erb partial using something like the
following:
<div class="field">
  <%= f.label :avatar %><br />
  <%= f.file_field :avatar %>
</div>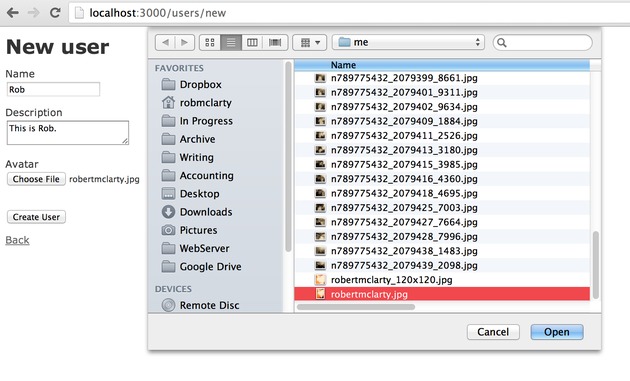
Then (this depends on how you want your app to work) you might want to show the avatar image on the User show page like this:
<p>
  <strong>Avatar:</strong>
  <%= image_tag @user.avatar.url(:large) %>
</p>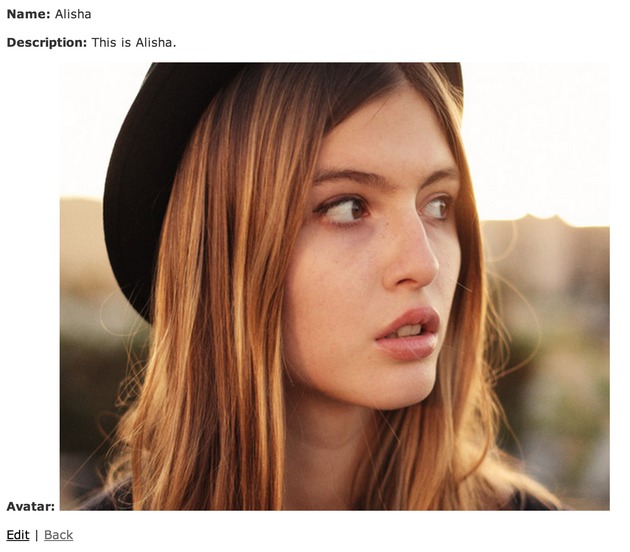
And maybe use the thumbnail in the User index page like this:
<td><%= image_tag user.avatar.url(:thumb) %></td>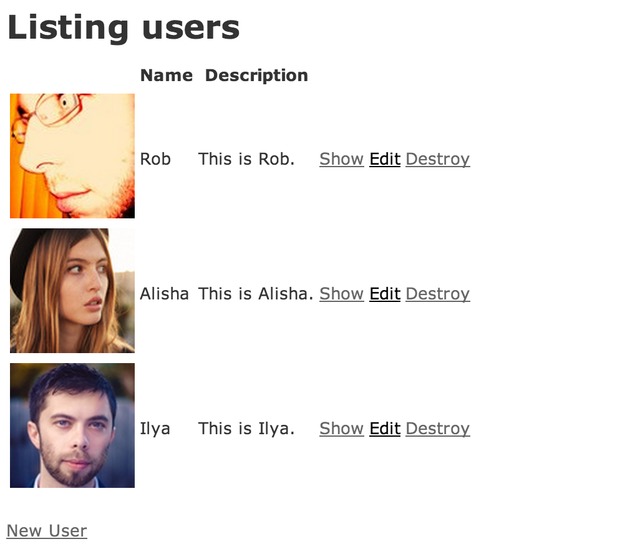
In these two "show" examples, Paperclip makes some helper methods available for generating the image path. All you need to do is access the "avatar" attribute on the User model and use its "url" method (passing in the style you want to use). This will then give you back the path to the specific file you want.
Check this out in action by looking at my example app.
Hope that helps get some more file uploads and images into your Rails apps! Let me know if you have any questions or if I missed something.
Thanks :)