How to Setup a Production Server for Rails 4
From a bare-bones virtual-dedicated server running Ubuntu, Apache, Passenger, and MySQL
Choose a Service Provider
I already had an account with Media Temple, so I thought that keeping all my cloud junk together and staying with MT would make things easier to manage, for me personally. I'm not getting paid to endorse MT in any way. Without my existing relationship I could have just as easily gone with something like Rackspace, Linode, or even Heroku.
I was previously using MT's DV server which is a pre-installed setup that comes with a custom CentOS and Plex configuration. But I noticed that when using this setup for clients, each time I ordered a new one, the configurations changed and I had to figure out how to solve problems I had already dealt with when I wanted to put together the same small Rails/Passenger production system I've used for all my apps. I was looking for something I could repeat on-demand with minimal unknowns. I wanted a workable recipe for putting new apps online that could handle a moderate load and get any of my apps from MVP to scaling problems in a predictable manner (at which point, my thinking was, I'd be in a position to work with people smarter than me to help with more elaborate configurations).

So for my production server (the one running this blog) I chose to go with Media Temple's VE server. It's a fresh install of an OS of your choice that lets you start from scratch and maintain full control. The key is that it came blank and only included what I put on it myself. This allowed me to start from, and stay with, known variables and make the process I developed repeatable (making subsequent installs require a lot less grey matter).
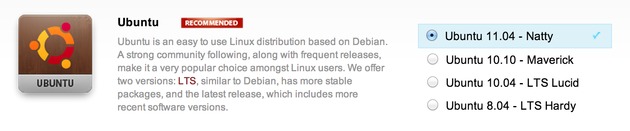
Install an Operating System
My choice of OS was Ubuntu 11.04 (although I would have preferred 12.04.2 LTS, but 11.04 is the newest version of Ubuntu MT offers). I wanted something newish and I wanted something with easy package management. Being based on Debian, Ubuntu gave me access to the great Advanced Packaging Tool (APT) which has made installing many libraries and dependencies a snap.
The following are the steps I took to get from brand-new Ubuntu install from Media Temple's account centre through to a working Ruby 2.0 on Rails 4.beta app running on Apache 2 and Phusion Passenger 4.rc4 (rc6 just came out as I'm writing this).
Create a Non-Root User
The very first thing I did was create a new user on my new server that isn't
root. Running everything as root is bad for security. In fact, I even
disabled being able to login in as root so it's impossible for anyone to gain
root-access to my server at all.
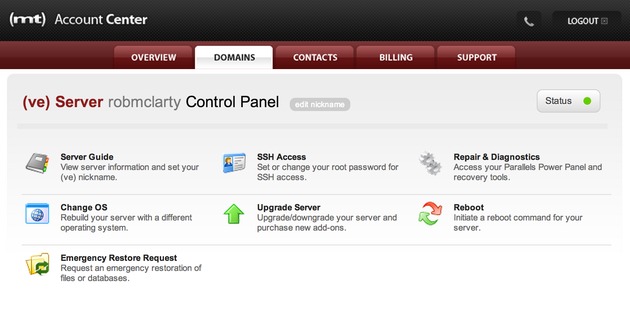
In Media Temple's Account Centre (their web interface where you pay for the stuff) there are a few simple tools, one of which is for generating a new root user password. I generated a new super-strong password (I keep track of all my logins with 1Password and use it to generate new unique passwords) and saved it through the web interface. That done, I left the web interface behind and jumped into the CLI to interact with the server via SSH.
On my local machine, in a terminal, I logged in like this (entering my password I just generated when prompted).
ssh [email protected]Once in, I created a new non-root user, and created a home directory while I was at it (for this article I'm going to use "bill" as the username).
useradd -d /home/bill -m billNext, I made a good password for my new user (generating another strong password with 1Password, but you could just make one up yourself that jives with whatever password management process you use).
passwd billAnd finally, I made my new user a sudoer so it (aside: does a user account on a server have a gender?) can do root level tasks when needed.
visudoThis will open the vi text editor for the sudoer file (you're going to have to
get your hjkl on to navigate the file; if you've never used vi before,
here's a cheatsheet).
I just added the following line below where the root user's privileges
are defined (obviously, use your own username for your server).
bill ALL=(ALL) ALLSetup SSH
As I said before, it's a good security measure to prevent root
from being able to login through SSH altogether (that's why I created a
new user). It's also a good idea to use a non-standard port number for
SSH so it's hard for automated bot scripts to figure out where to look
in the first place. I noticed when I installed a new server previously
and left the port at the standard 22, weird connections from Kazakhstan
and Russia where constantly trying to gain access, albeit
unsuccessfully. Better to make it that much harder for them to find you.
First, still logged in as root, I backed-up the existing sshd_config to
root's home folder.
cp /etc/ssh/sshd_config ~Then, I edited the active config file.
vi /etc/ssh/sshd_configI changed the following lines to disable root login, use a non-standard SSH port number, and white-list my new user (note that the AllowUsers is added to the very bottom of the file).
Port 4321
PermitRootLogin no
...
AllowUsers bill
Then I saved and reloaded the SSH daemon to enabled the new config settings.
service ssh restartor
/etc/init.d/ssh restartFor the curious, you can list all current SSH connections to your server with the command netstat. You'll sometimes be surprised with what's trying to access your server.
netstat -algrep sshAdd RSA Key to Server
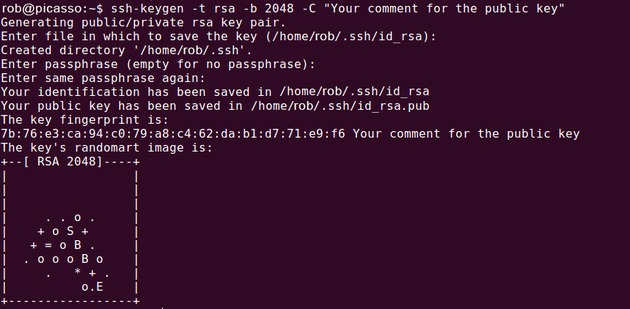
Adding an RSA key to the server allows access without the need for inputting your password every time. If you use a strong password like me, this will save you some hassle (I use a 50 character password with upper and lower case letters, at least 10 numerals, and at least 10 special symbols). This will also make it easier to run remote commands from your deployment scripts without being interrupted by password prompts so deployments go faster and smoother, requiring much less of your attention and making it possible for fast iterations.
On the remote server...
mkdir ~/.sshOn my local machine, after having already created an RSA key
in ~/.ssh using OpenSSH, I copied my public key to
the remote server's authorized_keys file.
cat ~/.ssh/id_rsa.pub | ssh [email protected] -p 4321 'cat - >> ~/.ssh/authorized_keys'Back on the remote server, I changed the file permissions of authorized_keys.
ssh [email protected]
sudo chmod 600 ~/.ssh/authorized_keys && chmod 700 ~/.ssh/
Then I checked the permissions on authorized_keys as a sanity check.
ls -la ~/.ssh | grep "authorized_keys"The output should be something like this:
-rw------- 1 bill bill 403 2013-04-05 11:55 authorized_keys
And on ssh directory,
ls -la ~ | grep ".ssh"The output should be something like:
drwx------ 2 bill bill 4096 2013-04-05 11:55 .ssh
Install Apache and Dependencies
![]()
Installing Apache has never been easier using apt-get.
First, I updated the repositories.
sudo apt-get updateThen fixed the locales.
sudo locale-gen en_US en_US.UTF-8 en_CA.UTF-8
sudo dpkg-reconfigure locales
And finally installed all the basic packages I thought I'd need.
sudo apt-get install apache2 curl git build-essential zlibc zlib1g-dev zlib1g libcurl4-openssl-dev libssl-dev libopenssl-ruby apache2-prefork-dev libapr1-dev libaprutil1-dev libreadline6 libreadline6-devSetup MySQL
![]()
I'm used to using MySQL">MySQL as my starting database server. You could alternatively use a more exotic NoSQL DB or Postgres or whatever floats your boat. Here I stuck with my old friend.
sudo apt-get install mysql-serverOnce installed, I needed to open a MySQL session using the server's root password so I could make a new database and user.
mysql -pFrom inside the mysql console, I created a new database, a database user, and assigned privileges to that user with a strong password (a new password for the database being created).
create database billdb;

grant all privileges on billdb.* to 'billdb_usr'@'localhost' identified by 'a-super-strong-password';

flush privileges;
Install Ruby + Rails From Source

I wanted to setup the bleeding edge on this server, so I went with a
source code install process for Ruby rather than a pre-existing package.
I installed Ruby 2.0
and Rails 4.beta. What I usually do to keep track of my source-code-installed
components is create a src
directory in my user's home folder inside which I store all my source
code folders for compilation, installation, and later, any
uninstallation I might need to do.
But before that, I needed to install a few more dependencies so my server environment was ready for it.
sudo apt-get install build-essential libyaml-dev libsqlite3-0 libsqlite3-dev sqlite3 libxml2-dev libxslt-dev autoconf libc6-dev ncurses-dev automake libtool bison subversionNext, inside /home/bill/src and got the latest Ruby, decompressed it,
configured, compiled, and installed.
wget ftp://ftp.ruby-lang.org/pub/ruby/2.0/ruby-2.0.0-p0.tar.gz
tar xzvf ruby-2.0.0-p0.tar.gz
cd ruby-2.0.0-p0
./configure
make
sudo make install
Next, I made a symbolic link from /usr/local/bin/ruby to /usr/bin/ruby
because some programs look for it there.
sudo ln -s /usr/local/bin/ruby /usr/bin/rubyThe newer Rubies come with rubygems so you don't need to
worry about installing that separately anymore. But before installing
any new gems (like Rails) it's always a good idea to make sure it's up
to date.
sudo gem update --systemFinally, now that there was a convenient beta1 branch for the Rails gem, all
I needed to do was install the latest Rails was the following.
sudo gem install rails --version 4.0.0.beta1I encountered some weird issues with rdoc and ri
where I had to answer "yes" to overwrite the existing versions. I just
went with it since this is a dedicated server and I care more about the
app working than some documentation that isn't necessary for me in
production. I'm sure this will be fixed in the final release.
Update: @kaspergrubbe gave me a great
little tweak so you don't need to specify --no-ri --no-rdoc every time you
install a gem in production: just add gem: --no-rdoc --no-ri to ~/.gemrc
(create that file if it doesn't already exist) and don't worry about ri or
rdoc again in production.
Setup Passenger with Apache
![]()
Phusion Passenger has been by far the easiest way I've found for
managing multiple Rails application instances on top of either Apache or
Nginx. It comes as a gem and has custom modules for both major web
servers. For Rails 4 I wanted to go with the latest version, which is
already packaged up into pre for easy installation through rubygems.
sudo gem install passenger --preOnce the gem was installed, I just ran the custom source compilation
script to get the web server modules installed. I chose to go with
Apache, so I'm using the Apache install script. For Nginx, you'd just
use passenger-install-nginx-module instead.
sudo passenger-install-apache2-moduleThe first time I ran passenger-install-apache2-module I encountered an error
because it wanted to use /tmp to execute temporary code, but /tmp was set to
noexec by default which prevents this (this is a good thing, so remote
attackers can't execute arbitrary code where the server stores uploaded
files). The error shows up as an issue with curl.
To work around this issue, rather than remounting the real /tmp, I temporarily
bound ~/tmp to /tmp and then unmounted it when I was finished.
mkdir ~/tmp
sudo mount --bind ~/tmp /tmp
sudo passenger-install-apache2-module
sudo umount /tmpUpdate: Hongli Lai from Phusion writes that "you
can just run passenger-install-apache2-module with the TMPDIR
environment variable set to a directory without noexec" so you don't need to
bind-mount the /tmp directory to work around the above issue.
With passenger installed, I then added two files to /etc/apache2/mods-available.
The Debian Apache package manages modules and sites through directories
and symlinks rather than a single monolithic config file. This is new
to me, but I like it. (read more)
First, I created a file called /etc/apache2/mods-available/passenger.load and
input the following code:
LoadModule passenger_module /usr/local/lib/ruby/gems/2.0.0/gems/passenger-4.0.0.rc4/libout/apache2/mod_passenger.soSecond, I created a file called /etc/apache2/mods-available/passenger.conf
and input the following code (you could tweak these settings, but I've found
this is a good starting point):
PassengerRoot /usr/local/lib/ruby/gems/2.0.0/gems/passenger-4.0.0.rc4
PassengerRuby /usr/local/bin/ruby
PassengerMaxPoolSize 6
PassengerPoolIdleTime 0
PassengerMaxRequests 1000
Then, I enabled the passenger module in Apache and restarted server.
sudo a2enmod passenger
sudo service apache2 restart
I then checked what modules apache was loading to verify passenger
was in the list. At first it wasn't working for me because I hadn't
activated the module using the a2enmod command. So this is a useful check:
apache2ctl -t -D DUMP_MODULESCreate an App and Test All the Connections
Finally, I created a test app directly on the remote server and fired it up to check that all the different pieces I just installed were working together.
First, I moved the default apache page to its own directory so I
could put other custom directories of my own (like for my app) in the
www directory and not have a default index.html file capable of rendering
at its root.
sudo mkdir /var/www/default
sudo mv /var/www/index.html /var/www/default/index.html
I usually make all folders directly under www the name of the domain or site
I want to serve (e.g., /var/www/robmclarty.com). Later, if I want to make a
separate microsite on a subdomain or something, I can make a new folder here
(e.g., /var/www/subdomain.robmclarty.com).
Next, I edited the default apache vhost to point to
/etc/apache2/sites-available/default
…
DocumentRoot /var/www/default
…
<Directory /var/www/default/>
…
Options FollowSymLinks # Remove IndexesUpdate: Dan Vokt writes that it would be easier to just use the a2ensite
command to do this... I didn't think of that because I'm new to managing things
with this command. Thanks Dan!
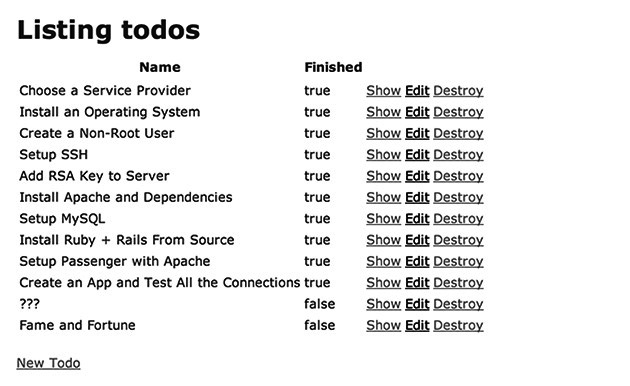
Then I created a new test app with a mysql setup, to kick the tires
and ensure the server was properly configured (this is done from inside
the /var/www/default directory). I added a simple 'todo' scaffold with a
name and a finished attribute that could be the beginning of a basic
todo-list app (just to test some actual usage, not simply loading the default
page).
sudo rails new testapp --skip-bundle -d mysql
cd testapp
sudo bundle install
sudo rails g scaffold todo name:string finished:boolean
I edited database.yml to connect to the database I made earlier.
production:
  adapter:  mysql2
  encoding: utf8
  database: billdb
  username: billdb_usr
  password: your-super-strong-password
I edited routes.rb to make the default view point to something real.
root to: 'todos#index'And finally I updated the app and restarted passenger.
sudo bundle install --deployment --without development test
sudo bundle exec rake db:migrate RAILS_ENV=production
sudo bundle exec rake assets:precompile RAILS_ENV=production
sudo touch /var/www/testapp/tmp/restart.txt
Configure Virtual Host to Point to App
The final step in configuring the server was to setup a custom
virtual host to point Apache to the new app directly (i.e., without
needing to use any port numbers or anything). To do that, I edited the
file /etc/apache2/sites-available/testapp.
<VirtualHost _default_:80>
  # ServerName www.yourhost.com # Commented out for default
  DocumentRoot /var/www/testapp/public # be sure to point to public
  <Directory /var/www/testapp/public>
    AllowOverride all
    Options -MultiViews
  </Directory>
</VirtualHost>
I activated the new site.
sudo a2ensite testappI deactivated the default site.
sudo a2dissite defaultAnd reloaded apache to enabled the new configurations.
sudo service apache2 reloadThat's it! Now, when I pointed to my server's IP address I was able to see my newly created Rails app and it worked properly (albeit with no authentication, haha).

In a future post, I'll walk through setting up a new app locally and using capsitrano to deploy it to the production server, as well as installing ImageMagick for doing fancy image processing server-side when users upload bitmaps to your app.
If you have any questions, or notice something in this process that could be improved, please let me know.
Update
This post was featured on Ruby5 and Ruby Weekly. Thanks guys!
Kurt Sussman emailed me with some good suggestions to fine-tune your server setup even further:
- Use
ssh-copy-idto get your public key onto your server in fewer steps. I wasn't sure how to do this with a custom port number, but found some solutions to get around this. - Speed up Ruby even further with some environment variable tuning (
tcmalloclib can be installed viaapt-get):
<pre><code> export RUBY_GC_MALLOC_LIMIT=1000000000
 export RUBY_HEAP_SLOTS_GROWTH_FACTOR=1.25
 export RUBY_HEAP_MIN_SLOTS=800000
 export RUBY_FREE_MIN=600000
 export LD_PRELOAD=/usr/lib/libtcmalloc_minimal.so.4
- Consider using a provisioning script to automate all this setup nonesense like [5minbootstrap]https://github.com/phred/5minbootstrap).